AppleScript Tutorial 2 - Customizing Scripts

2004-05-31 


http://www.barefeetware.com/applescript/tutorial/02/

Description


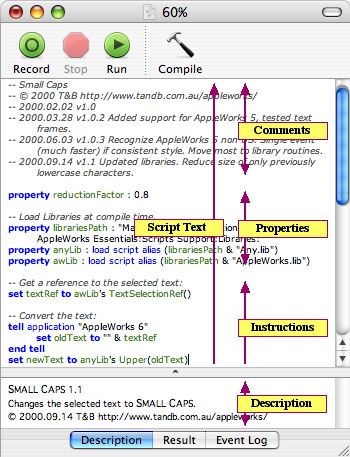
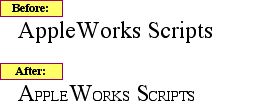
This tutorial, the second in the series, examines and customizes some prepared scripts to demonstrate how scripts are structured and modified.
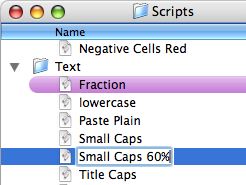
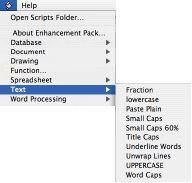
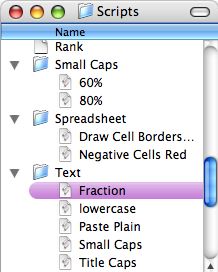
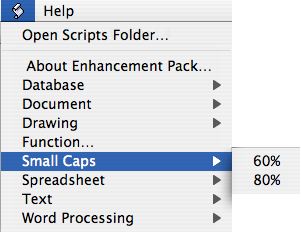
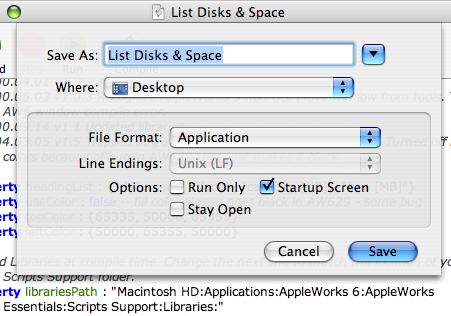
Enhancement Pack


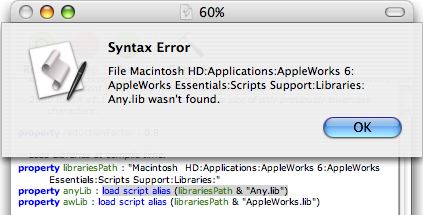
This tutorial uses the scripts in the Enhancement Pack for AppleWorks. If you don’t already have them, download and install the Enhancement Pack.

AppleScript
Tutorial


The index of this AppleScript tutorial series.

Tutorial 1


If you have not already completed tutorial 1, go back to it now.

Tutorial 3


Go on to start learning about scripting “dictionaries” as you begin to learn how to write your own scripts.


Objectives
This second tutorial should give you answers to:
    1. How do I open, duplicate and save a script?
    2. What does a script look like?
    3. How can I change a property of a script?
    4. How do I make a script into an application that I can double click in the Finder?

We’ll continue to look at some scripts that were “prepared earlier”, since this lesson focuses on customizing existing scripts, not yet writing new ones.

Duplicating Scripts
You can use one script as the basis for another script. By duplicating the original, altering the duplicate and renaming it, you can easily create a new, slightly different script in the Scripts menu.

Exercise 1: Duplicating the Small Caps Script
Let’s duplicate the Small Caps script. (So we can later modify the duplicate to behave slightly differently to the original).
    1. In AppleWorks’ Scripts menu, select “Open Scripts Folder”.
    2. In the list of Scripts that appears, you should see the “Small Caps” script, in the “Text” folder. Click once on it to select it.
    3. Duplicate the file (eg by selecting “Duplicate” in the File menu).
    4. Rename the “Small Caps copy” file to be “Small Caps 60%”, as shown in Figure 1.


      Figure 1: Two “Small Caps” Scripts.


    5. In AppleWorks, check that the Scripts menu now contains “Small Caps 60%” as well as the original “Small Caps” (see Figure 2). If it does not show the new script (it probably will for AppleWorks 5 but won’t for AppleWorks 6), quit and relaunch AppleWorks and check the Scripts menu again. The new “Small Caps 60%” script does the same job as its original, but we’ll change it soon.


      Figure 2: A Duplicated and Renamed Script.


Creating Sub-Menus
As you add more scripts, your Scripts menu can get quite long. As you’ve already seen, the Scripts menu lets you organize your scripts into separate sub-menus (such as “Text” or “Spreadsheet”), by using folders within the Scripts folder.

AppleWorks 6 unfortunately only permits one level of Scripts sub-menu, which means that only the first level of folders within the Scripts folder is recognized. So you can’t, for instance, create a new sub-menu within the existing “Text” sub-menu. But you can create new folders in the Scripts folder to become one level sub-menus.

Exercise 2: Building a Small Caps Sub-Menu
Try this exercise to create your own sub-menu within the Scripts menu.
    1. If not still showing, open the AppleWorks Scripts folder.
    2. Make a new folder (eg using the Finder File menu’s “New Folder” command).
    3. Name the new folder “Small Caps”.
    4. Move the “Small Caps 60%” file into the new “Small Caps” folder.
    5. Rename the “Small Caps 60%” file to be just “60%” (ie remove “Small Caps ”, including the space, from the file name). Duplicate it and name the duplicate file “80%”. The folder structure should now should look like Figure 3.


      Figure 3: New “Small Caps” Folder Containing Renamed Scripts


    6. Return to AppleWorks and click on the Small Caps sub-menu in the Scripts menu, which should look like the example in Figure 4 (if not, quit and relaunch AppleWorks). Don’t select any command in the menu for the moment.


      Figure 4: “Small Caps” Sub-Menu in the Scripts Menu


Examining a Script
As a script user, you only need to know what the script does and how to run it, such as selecting it in the Scripts menu. Up to this point in the tutorial series, the exercises have covered using scripts. Now, this tutorial deals with examining the contents of a script and customizing how it works. But you still don’t need to type any “code”.

A script is saved in a special AppleScript file format. When run, AppleScript executes the instructions contained within the script. To view and edit these instructions, you need a script editor, the most common of which is Apple’s “Script Editor”, supplied as part of the AppleScript software.

All of the examples in this tutorial will show the Apple’s Script Editor, unless noted otherwise. All of the font formatting shown here (such as italic gray text for comments), uses the default settings for Script Editor.

As shown in Figure 5, the script window contains two sections (also called “window panes”) – the description and the script text. The description displays freeform text that explains the purpose of the script, but is ignored by AppleScript. The script text section of the window contains the instructions that AppleScript follows to achieve the desired result.

The italicized text are comments that are ignored by AppleScript but can be read by the user when the script is opened. Comments provide more detail to a scripter (the person who writes scripts) as to what each part of the script does.

Exercise 3: Opening the Small Caps 60% Script
Let’s take our first look at the contents of a script.
    1. If not still showing, open the AppleWorks Scripts folder. (You can do this by selecting “Open Scripts Folder” in AppleWorks’ Scripts menu.)
    2. Open the “60%” file you created in the Small Caps folder. You can open it just by double-clicking on its icon. (If your computer does not launch Script Editor when you open a script, it is probably not on your system. You should reinstall the AppleScript software from your Mac OS CD).
    3. If you cannot see the “Description” pane section at the bottom, drag the divider up from the bottom to reveal the collapsed pane. (Script Editor windows in Mac OS 9 and earlier appear slightly different, but with the same components.)
    4. Have a close look at the contents of the script. It should look like Figure 5. If the script text on your screen is all one font format (such as purple plain text), then it probably needs to be “compiled” in order to format the text according to purpose. We’ll do that in the next exercise.


      Figure 5: Viewing a Script in Script Editor.


    5. Leave the script open for the next exercise. Don’t worry about the instructions in the script text, for now. The scripts that you write in following tutorials will be much simpler natural language.

Properties
The script text usually starts with a list of its properties, as shown in Figure 5. Each property of a script can be text, a number, or a reference to a file, among others. For the end user, a property provides an idea of the settings used in the script and makes it easy to alter the script’s behavior. If you open a script and see a property declaration that you’d like to change, you simply edit it and save the script.

Scripts often include properties that load other scripts before being saved. Such properties are called libraries, and usually invoke the “load script” command, as shown in Figure 5 for the “anyLib” property. If you install a script on a new computer, then modify it, when you compile the script, AppleScript checks the syntax (confirms that the script text makes sense) and needs to locate the included library files. If it can’t, then you need to change the path to match the location on your computer. This should be clearer after you complete the next exercise.

Exercise 4: Adjusting a File Property for a Library
Let’s modify a script to force AppleScript to check the syntax and locate the library files. Most scripts in the Enhancement Pack include properties that rely on the “librariesPath” to locate some script files.

    1. You should still have the “60%” Small Caps script open from the previous exercise.
    2. Click at the end of any line in the script text and type a space (without replacing anything). This minor change marks the script syntax as uncompiled. (In old versions of Script Editor, an uncompiled script is evidenced by the “Check Syntax” button becoming enabled.)
    3. Click the “Compile” button (or the “Check Syntax” button in old Script Editors) or hit the Enter key. If your copy of AppleWorks is not installed in exactly the place expected by the script, or your hard disk is named differently, then the script editor will display the error message shown in Figure 6.


      Figure 6: Indication That the librariesPath Property Needs Correcting


    4. If you do see the error in Figure 6, then change the text inside the quotes after “property : librariesPath” to match the location of the “Scripts Support:Libraries” folder on your computer. For instance, if you have AppleWorks 6 installed in the default location on your startup disk called “My Disk”, then you should correct the line to be:

      property librariesPath : "My Disk:Applications:AppleWorks 6:AppleWorks Essentials:Scripts Support:Libraries:"

    5. Try the “Compile” button again to verify. When compiling no longer displays an error, your alteration is successful. Keep the script open for the next exercise.

Exercise 5: Changing the Small Caps Reduction Factor Property
When you used the Small Caps menu item earlier in Tutorial 1, it made the lowercase letters in each word 80% of the size of the uppercase letters. As you can see in Figure 5, the first property of the Small Caps script is the “reductionFactor”. As its name implies, this property affects the reduction factor of the trailing letters in each word. Let’s change it.

    1. In the “60%” Small Caps script window, change the “reductionFactor” from 0.8 to 0.6 by replacing the “8” with a “6”. That is, change the script from:

      property reductionFactor : 0.8

      to:

      property reductionFactor : 0.6

    2. Compile the script (by clicking the “Compile” button).
    3. Close the script and save the changes.
    4. In AppleWorks, create a word processing document, type some words that include some upper case letters, select those words, and select “Small Caps -> 60%” in the Scripts menu. The lowercase letters should be converted to uppercase but 60% the size, similar to Figure 7.


      Figure 7: Small Caps at 60% Reduction Factor


Applets and Droplets
The scripts we have used so far are more precisely called compiled scripts. You can also save a script as an application called a script application or an applet. Like any other application, you can run applets by double-clicking on them or by adding and clicking them in the Dock (or selecting them from the Apple menu in Mac OS 7-9 or earlier). Some applets can also accept files dragged and dropped onto them – we call these files droplets.

The icons for compiled scripts, applets and droplets appear in Figure 8, and a sample of the Finder’s Get Info window for a compiled script appears in Figure 9.


Figure 8: Compiled Script, Applet and Droplet Icons for Mac OS X and Earlier Systems


Figure 9: Get Info Window for a Compiled Script


Compiled scripts and applets (including droplets) behave differently. If you double-click on a compiled script, it opens in your script editor, ready to be edited. Double-clicking on an applet runs the applet. (To edit an applet you have to open it from within the script editor or drag and drop the applet onto the script editor.)

(In AppleWorks 6, compiled scripts and applets in the AppleWorks Scripts folder will both appear in the Scripts menu. In AppleWorks 5, only compiled scripts are displayed.)

Exercise 5: Saving As an Applet
The “List Disks & Space” script, installed by the Enhancement Pack in the AppleWorks Scripts menu, creates a spreadsheet of information about disks in the Finder. It may be useful to be able to run this script without having to first launch AppleWorks. So, let’s save it as an applet on the desktop.
    1. In AppleWorks’ Scripts folder, in the “Document” folder, open the “List Disks & Space” script. It should open in Script Editor.
    2. If the script is not compiled, compile it, correcting the “librariesPath” property for your disk, if necessary.
    3. In Script Editor’s File menu, select “Save As”.
    4. Change the location to the Desktop, or another convenient place on your computer.
    5. In the “Format” pop-up menu, select “Application” (or “Applet” if using Mac OS 9 or earlier). The Save As dialog box should look something like Figure 10.


      Figure 10: Save As an Application


    6. Click the “Save” button to save the script as an applet on the desktop. Close the script window.
    7. Switch to the Finder. Double click the new “List Disks & Space” applet that you just saved (probably on the Desktop). It should display its description, as shown in Figure 11.


      Figure 11: Applet Run Window


    8. Click the “Run” button. After a few seconds, the applet should create a new spreadsheet in AppleWorks containing information about the disks mounted in the Finder, then automatically quit. To see the new spreadsheet, switch to AppleWorks. It should look similar to Figure 12.


      Figure 12: Result of List Disks & Space


Supplementary Exercises
Try this supplementary task:
    1. Duplicate the “60%” script you created earlier to create a third script that reduces the text to 40% of its original size (ie change the “reductionFactor” property to 0.4). When you are done, your Small Caps sub-menu should offer three choices: “40%”, “60%”, and “80%”.

Tidying Up
You don’t need anything created in this tutorial chapter for the subsequent exercises. So, unless you want to keep them, you can:
    1. Trash the “Small Caps” folder (and the 60% and 80% scripts inside it) from AppleWorks’ Scripts folder. Do not trash the original “Small Caps” script in the “Text” folder.
    2. Close any tutorial related windows still open in Appleworks or Script Editor, without saving.
    3. Trash the “List Disks & Space” applet from the desktop.

Conclusion
So now you should have some idea of what scripts look like, how to change the Scripts menu, and how to make basic modifications.

In the next tutorial you will start to write scripts from scratch, after examining the “dictionary” of instructions that an application understands.

Next...
In the next tutorial you will examine the “dictionary” of instructions that an application understands, so you can go on to write scripts of your own.

© 1998 - 2004 BareFeetWare
Please email us any queries about this page.